DIY Horizontal Privacy Fence
This post is sponsored by The Home Depot.
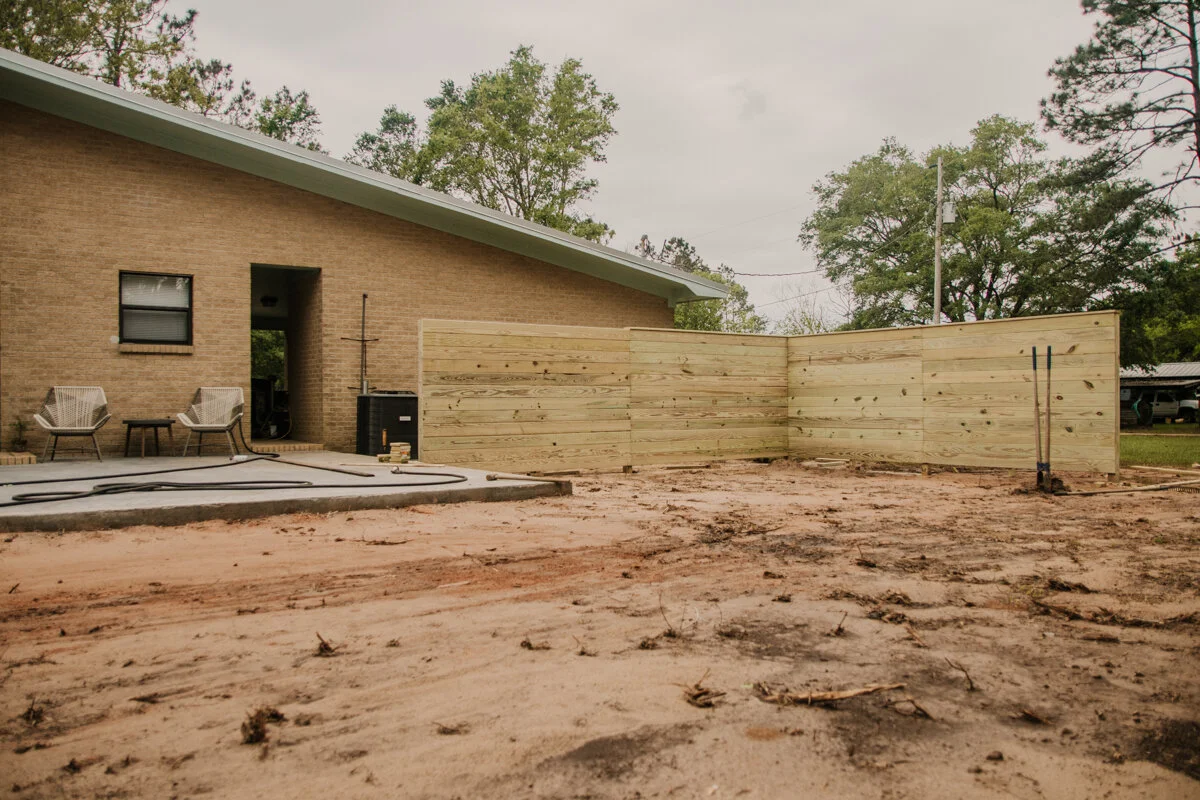
Spring has sprung, and we are outside with a new outdoor project! We are currently doing a whole makeover on our backyard and back patio, and this space really needed a privacy fence, not just any privacy fence, but a modern horizontal privacy fence. Our house is a mid-century style, so we are keeping the modern vibe throughout our projects and builds for this home.
Materials (affiliate links):
Obviously, the amount or quantity of boards depends on your size fence, but this is what we used
2 in. x 6 in. x 8 ft. #2 Prime Southern Pine Pressure-Treated Board: https://homedepot.sjv.io/6beMkG
2 in. x 6 in. x 12 ft. #2 Prime Southern Pine Pressure-Treated Board: https://homedepot.sjv.io/OV6yK
4 in. x 4 in. x 8 ft. #2 Ground Contact Pressure-Treated Southern Yellow Pine Timber: https://homedepot.sjv.io/9NE90
60 lb. Gray Concrete Mix: https://homedepot.sjv.io/yR26ZW
2 in. x 4 in. x 8 ft. #2 Prime Ground Contact Pressure-Treated Lumber: https://homedepot.sjv.io/yR26ZW
Make sure your ground is graded properly first.
The very first thing we did was make sure the ground was graded. This depends on your land, but ours needed to slope so that water could run away from the house. Better to all this now before a fence is put in place! Also, make sure utilities are not running where you plan to put your posts! This fence's whole point was for one, to hide our AC unit and some other piping that leads to a propane tank. Our well pipes that lead up the house are in the same area, so we made sure to find exactly where those were as well.
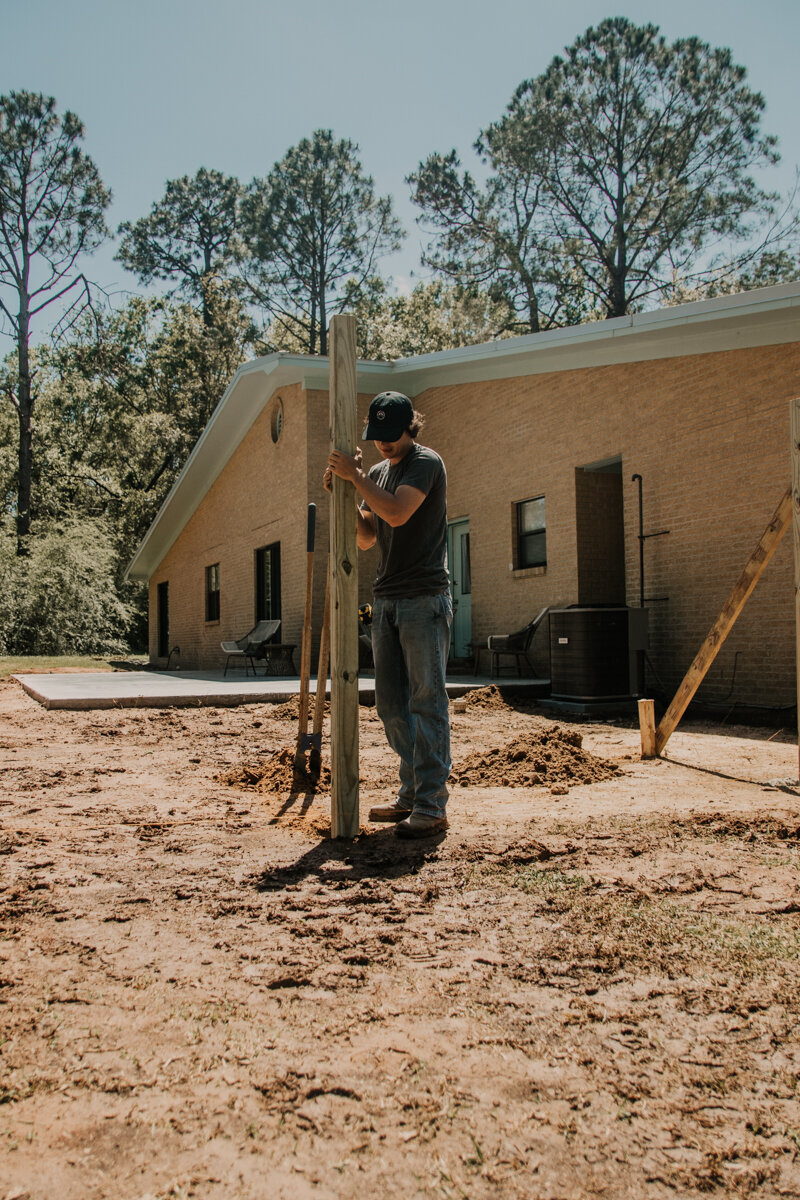
Set your corner posts.
Now build time! The first post that needs to go in is your corner post. We have 2, so pick and choose which one first. These need to be square so that the rest of the fence isn’t wonky and make sure there are no roots where they are going—these need to be extra strong. When you dig your post holes, make sure to dig 2-3 inches larger all the way around your post for concrete to be poured in. You also want to get your post as close to 2ft into the ground as possible; we did 20 in. Our 4x4 posts are 8ft long and 2ft into the ground. That will give us a 6ft fence. We will come back and cut off the tops to exactly 6ft when we are all done.
*Note: If you are building a fence off the side of your house creating a straight line from house to fence, inset the fence. It’s almost impossible to get the fence as straight, or inline, with the house, so inset the fence a little (we did 12in). You could also push it further away from the house as well, either works! Our is just a privacy fence, so we are taking it in.
Add dry concrete, brace posts, and then add middle posts.
So now, once you have your hole dug, tamp the bottom of the hole with your post to compact the dirt and then do your measurements again to see if you need to add or take out any more dirt. Once everything looks good, grab a buddy to help hold and keep the post level while you fill in a few inches of dry concrete. Get an old broomstick, or whatever you can find, and pack in the concrete, add a little more concrete, pack until you have almost filled your hole. I’m sure you are thinking you add water in next, NO. Brace off your posts and move onto the middle posts. Keeping the concrete dry and adding water at the end will expedite the building process, this way, you aren’t waiting a day for the concrete to dry.

Moving onto the other posts! Now, you can grab a string and a few nails. Tap the nails into the outside corner, yes into the corner of the post. Tie your string to both nails; check out the video above starting at 12:50 to how to get your string tight. Now mark off the middle of your two posts and dig your hole. When you set the post in, make sure that the outside face jussstttt touches that string, also make sure it’s level, and you can set it with the brace and concrete.
Add fence boards!
Fence board time! So we decided to use deck boards for the fence to get that easily achievable modern look. We are leveling these boards on the fence as true level. You can build your fence to be parallel to the ground, but honestly, that would drive me crazy, so we are going true level. We found the lowest post we had held up a board flush to the top of that post, made it level, and nailed it to the middle post. There will be excess 4x4 post above the fence boards in the middle post and the end post, and we will come back by and cut those off later. We also brought that fence board to the middle of the middle post, so everything is nice and symmetrical. When you get your 2 top fence boards up, you can follow those all the way down to the bottom, occasionally checking level. We had some hang-off the end posts that will be cutting flush later as well.
Once we got one side of the fence up, we set the concrete with the hose but also a power washer and sunk the wand to the bottom to fully saturate the bottom with water. Now to do the other side of the fence!
Once it’s all up, we are going to cap the tops off with another 2x board laying flat on top, just to give that finished feel.
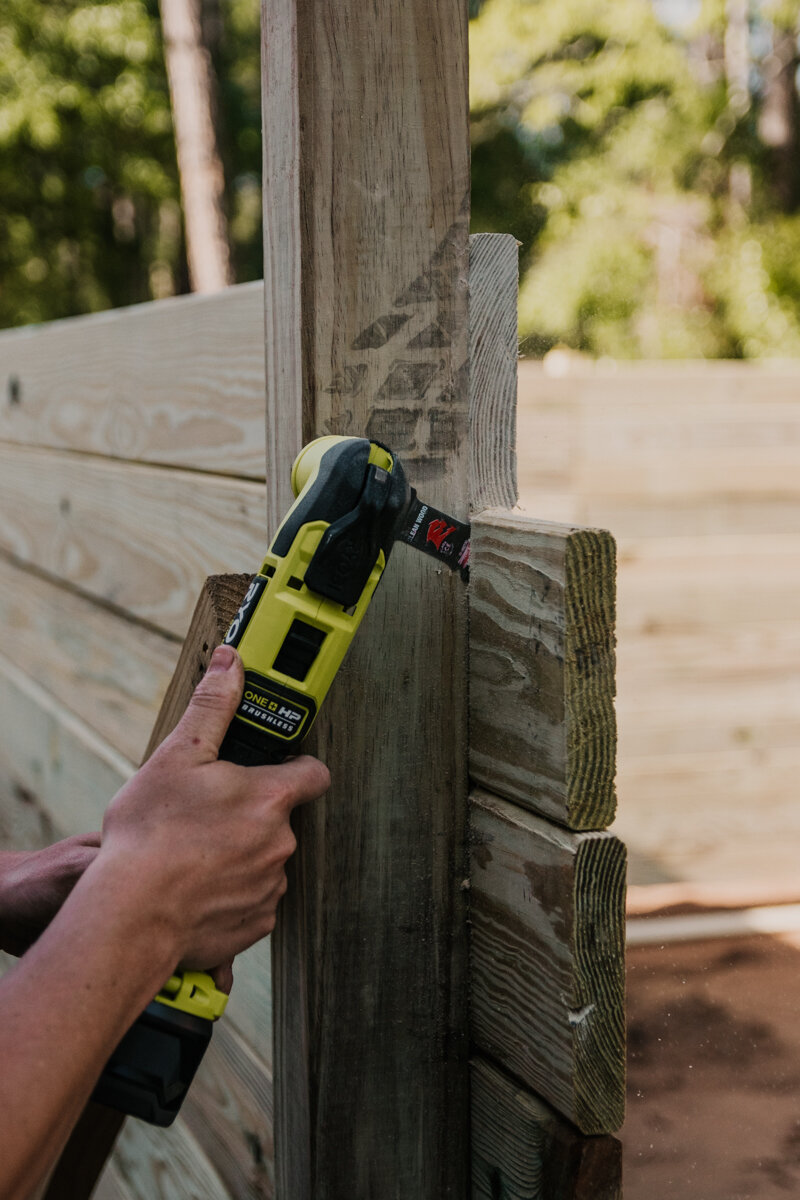
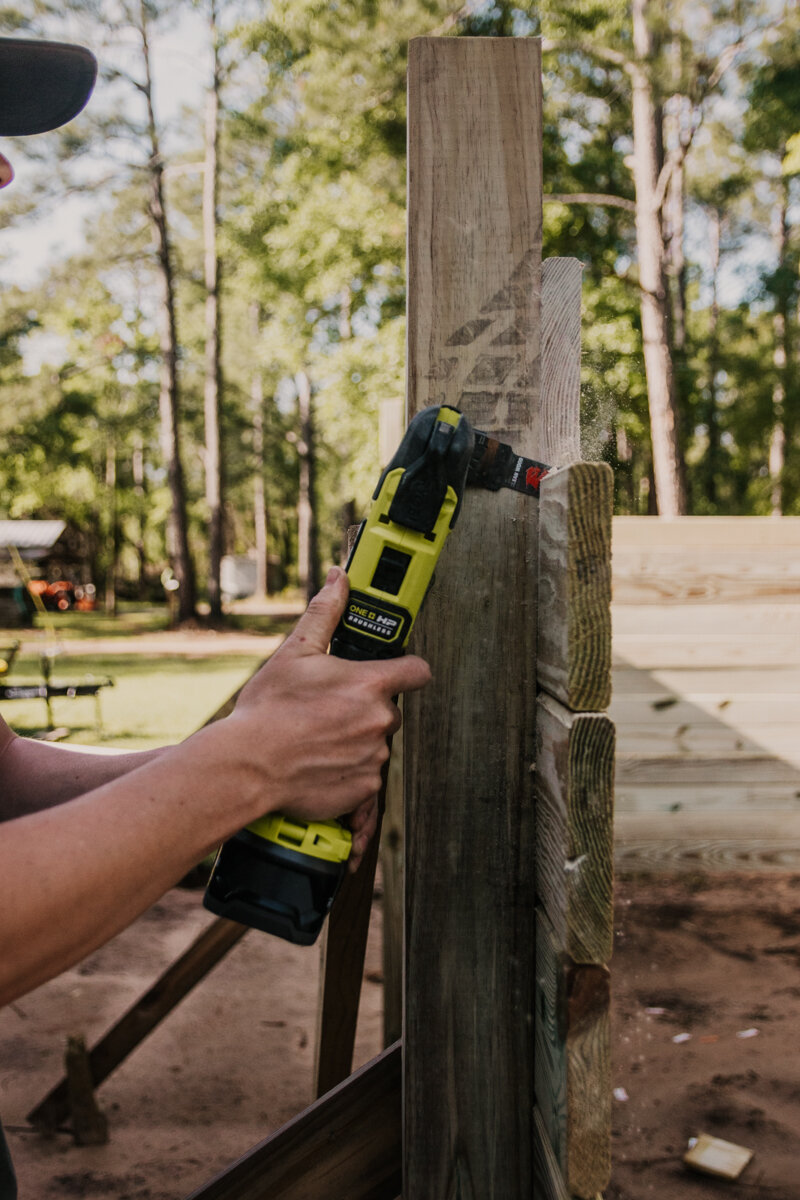
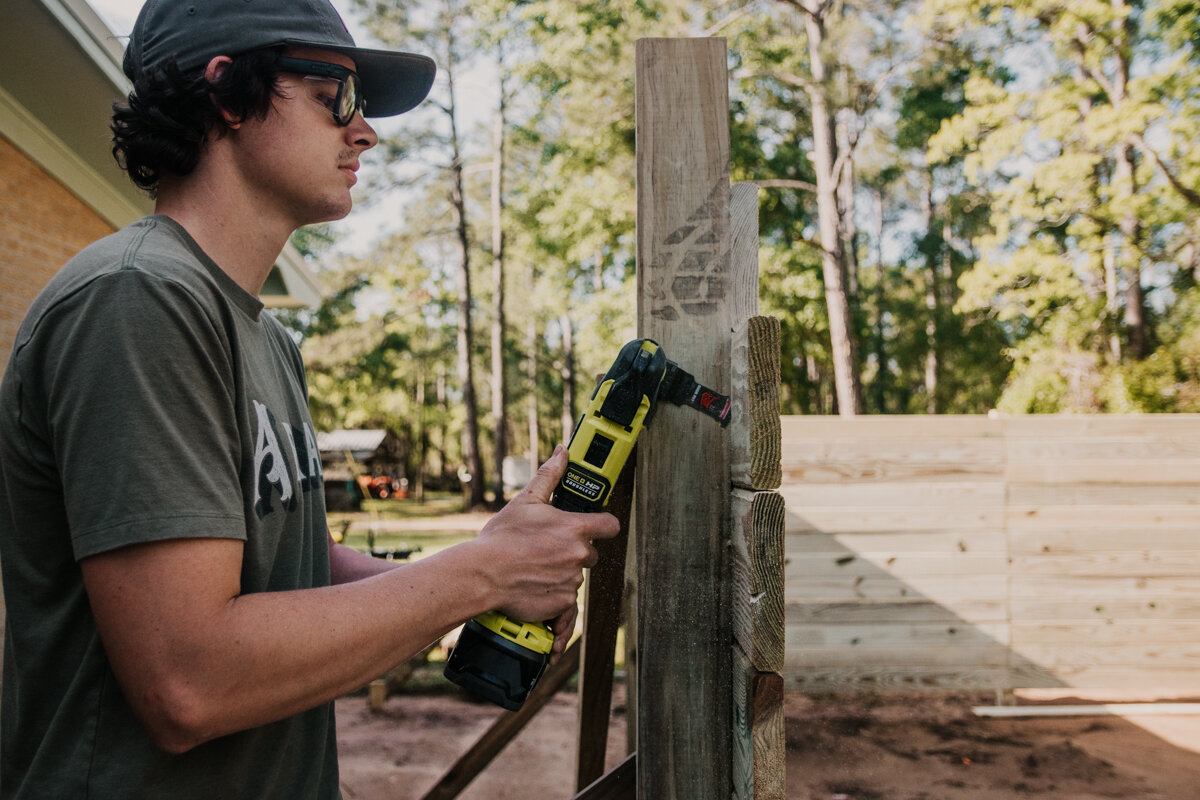
Now to cut the wild ends flush. We are trying out the new Ryobi ONE+ HP 18V Brushless Cordless Multi-Tool from Home Depot! These multi-tools are seriously the best, hence the name, because they are great for everything. What we are going is a really heavy-duty application for this tool and for what it’s meant for, but why not put it to the test. What we really like about this tool from the get-go is the clip to hold your cutting tool in place, it feels really hefty and you have comfort that your cutting tool won’t fly off. Another thing is the variable speed dial, we are turning this puppy to around a 4 or 5; anything further than that for what we are going it’ll vibrate too much and kind of get away from you.
After using it, it does take longer than a reciprocating saw, but the finish is top-notch. The cut is clean with no tear-outs like a reciprocating saw leaves. If you are willing to spend the time for this kind of job with this tool, be our guest because we can’t get over that cut!
Final thoughts. You can't beat it for $99 and especially if you are already in the Ryobi family. Totally recommend this tool! The only con we found was the extra step to put on and take off the cutting tool, especially if you are two different things with the tool and need to be switching back and forth. Other than that, we are calling this Woodbrew approved!
Add 2x4s to the backside to keep fence boards from sagging and warping.
The next part of this build is adding 2x4’s on the backside of the fence boards in the middle of the two posts. We turned the 2x4 sideways, so in the future, we decide to add more fence boards on the back, we can. We nailed these boards from the front of the fence, and this will help keep those fence boards from bowing in and out and from sagging.
The last thing is cutting off the excess of the posts and 2x4s! We are still deciding on a finish to spray; we want to keep it looking as new as possible and from aging to grey. If you have any recommendations on anything that would help, DM us on Instagram!
Check out more projects here!